

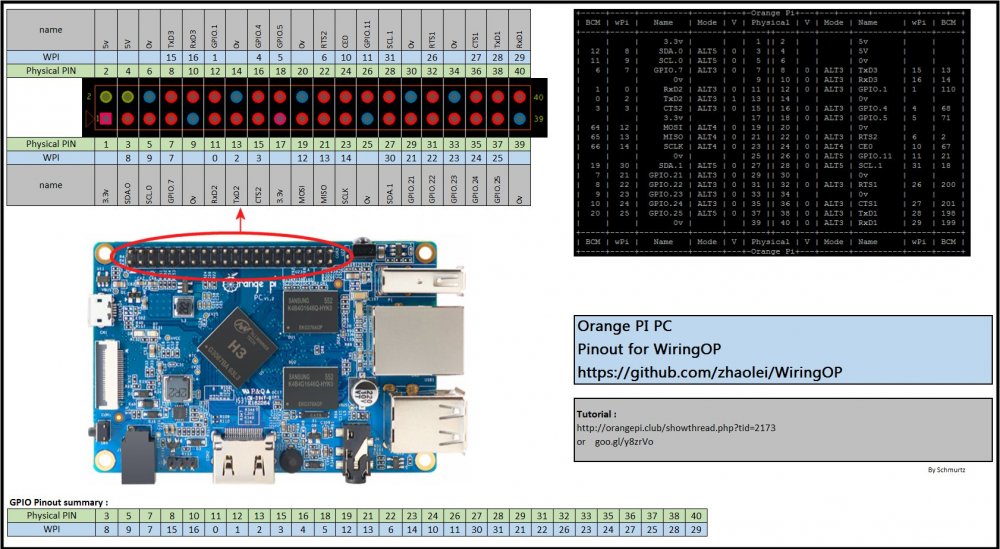
The OpenBSD gpioctl command can be used to access the Orange Pi PC2's gpio pins. Eight gpio devices are in dmesg. After creating devices in /dev for them (only gpio0, gpio1, and gpio2 are created by default) they can be queried to see what pins are usable,
| Device | Pins |
|---|---|
| gpio0 | 20 |
| gpio1 | 0 |
| gpio2 | 17 |
| gpio3 | 3 |
| gpio4 | 16 |
| gpio5 | 1 |
| gpio6 | 14 |
| gpio7 | 10 |
The pins on the connector map to the gpio device pins as follows.
| GPIO | Pin | Pin | GPIO |
|---|---|---|---|
| 3.3v | 1 | 2 | 5v |
| 0-12 | 3 | 4 | 5v |
| 0-11 | 5 | 6 | Gnd |
| 0-6 | 7 | 8 | 2-5 |
| Gnd | 9 | 10 | 2-6 |
| 0-1 | 11 | 12 | 3-14 |
| 0-0 | 13 | 14 | Gnd |
| 0-3 | 15 | 16 | 2-4 |
| 3.3v | 17 | 18 | 2-7 |
| 0-15 | 19 | 20 | Gnd |
| 0-16 | 21 | 22 | 0-2 |
| 0-14 | 23 | 24 | 0-13 |
| Gnd | 25 | 26 | 0-21 |
| 0-19 | 27 | 28 | 0-18 |
| 0-17 | 29 | 30 | Gnd |
| 0-8 | 31 | 32 | 6-8 |
| 0-9 | 33 | 34 | Gnd |
| 0-10 | 35 | 36 | 6-9 |
| 3-11 | 37 | 38 | 6-6 |
| Gnd | 39 | 40 | 6-7 |
The gpio0 pin 20 lights a red LED next to the green power LED on the board.
Installing onto the Orange Pi PC 2 you'll need the dtb and the u-boot-sun50i packages.
Once the boot media is done, insert it into the PC2 and boot it. Remember, it defaults to a serial console. Perform the OpenBSD install as usual.
To use HDMI out, create /etc/boot.conf containing the line:
set tty fb0
This tells the kernel to use the frame buffer as the console. You can also run X. To get X running on startup:
doas rcctl enable xenodm
Packages on the mirrors are named differently to the install:
To make the package manager easy to use, set the PKG_PATH environment variable to something useful in your .profile, e.g.
PKG_PATH=https://ftp.openbsd.org/pub/OpenBSD/7.3/packages/aarch64/
export PKG_PATH